Wednesday, May 15

Basement Overhaul!


When I was a kid I used to stand by the light switch before going to bed. Once I turned off the light I would run in an all out sprint and leap onto my bed hoping that the creature who had taken up residence under the bed wouldn't grab my feet. As an adult I found I did the same thing when leaving my basement. 

*shudder*

Our basement had been a storage unit for two years. It was the part of the home tour we left off. 

"Oh, you have a basement?"
"Uh, sort of?"
"Is it not finished?"
"It is...but, it's gross. I'm sorry you but you can't see it."

My most insistent guests would soon regret their eagerness to view the dingy dungeon. The photo below brings back so many memories. The make-shift cat house I built from our moving boxes (sorry, no tutorial!), the rugs I accumulated from family members, the stains on the carpet from previous owners, the in-your-face-overhead lighting, the black hole of death leading to the adjacent room...and the list goes on. We pitied our cat having to go down there to use the litter box. Ah, how depressing it was to change our cat's litter. HA! Who am I kidding...that was my husband's job until I took on this project...why would I want to willingly go to the basement?! Are you crazy?! Just look at it! I'm sorry...this picture really tests my nerves.   

But enough of that. Since I've known my husband he's always wanted a drum  set. Long story short, I made it my mission to get him one for his birthday. With the help of some amazing friends I landed the deal of the century on a beautiful drum set on Craigslist. That created a problem. 

Where was I going to put it? 
It had to go in the basement.                
But we don't go in the basement.                       
I had to fix that.                                    
With the help of my wonderful father...we did just that.                                              


It started with paint. I chose Peppercorn by Sherwin Williams. It's not as blue as it looks above. I just have a bad camera (sorry!). Then came the trim. I shudder thinking of the grossness that once laid upon that poor trim. Then came the wall of records. Dad bought 6 foot pieces of thin boards and used his router to make a slit just wide enough to hold records. He painted them black and we secured them to the studs in the wall. All we had to do was slip in the most attractive records I had. Did you know not all record covers are the same size? That was annoying.


this is an accurate portrayal of the paint color


Once the records were up I used the space as a workshop for about 2 weeks to makeover my retro music
cabinet. The record player did not function so I gutted it. Ripped out the speakers, cleaned it, sanded it, painted it. I used ASCP in Old White for the outside and SW Juniper for the inside where the speakers once were. Grabbed a few knobs at Hobby Lobby, put in some baskets I had and ta-da!


That plug in the middle of the wall really grinds my gears.

I have quite a few instruments, ukulele, mandolin, electric guitar, acousitc guitar, tambourine, drum set, cow bell, keyboard and a harmonica. They all have a home now. The posters I found on Craigslist. Do you see the chalkboard in the distance...that's one of my favorite parts of the new basement!


This was the first thing my husband saw as he walked down to see the rest of his present. It's now become a favorite spot for family members, young and old alike! It was so easy to paint, the hardest part was waiting three days for the wall to cure. 

This room is now my husband's favorite spot. He's a natural drummer and we spend a lot of time playing and learning new songs. The adjacent room received a mini-makeover by rearranging the furniture in a more appealing way. It will one day get an overhaul like the music room...but for now, it'll do.


Before
AFTER

 And just for kicks...a side by side before and after!


Monday, August 27

Something Yellow

After painting my buffet I knew I wanted to compliment the Juniper color with yellow. It just seemed like the right color combination. How was I going to incorporate it? I was patient and waited.

Then one day while searching through the art section of Goodwill Auction online I saw it. It was perfect.

Large Picture

I love anything to do with piano, but normally art is pretty cheesy when it has a piano in it. But this was a replica of an old advert for A. Bord pianos from the late 19th century. There was no damage to the frame or print, it was in great condition! Sold! I snagged this lovely for $5. With shipping it was about $25. That's better than the retail price $214.99 sold here .

I could not wait to hang this up! 


I'm so happy with it. Every time I add on to a room I can't help but walk by it every 5 minutes and smile. 

Tuesday, July 3

oh my buffet!

Some people call it a sideboard but I call it a buffet. No matter what you call it, it's such a great piece of furniture. Those legs! The designs! The storage without overcrowding the space! It's perfect and I wanted one. But they don't make them like they used to and even if "they" did, I wouldn't spend $500+ on one. I also knew no one would have it in the color I pictured for my gray & white dining room.

here's the style I like:


but I wanted it to look like this buffet painted by European Paint Finishes

I just love it and wanted to do something similar. So I searched. And searched. And searched for probably 2 months for a buffet on Craigslist that met my budget. I got bupkis. I didn't give up. Then one day in a town 40 minutes away there was an old buffet in someone's storage unit that called my name. It was darker than I wanted and in rougher shape than I imagined. But it had wheels!! I went. I loved. I painted.


But first I did something only a rookie would do. I tried to take off the veneer. I know you just winced and maybe got a little angry. I get that way too just thinking about it. But if you only saw the shape it was in you would try to fix it too. Okay, maybe not. I took off about 25% of the top before realizing it was a bad idea. Then it sat in our garage for about 3 weeks before I tackled it again.

I headed over to my local hardware store for some wood filler and a sander. While browsing through hand sanders I heard someone ask "whacha lookin' for?" Paranoid and distrustful I brushed off the older gentleman with the long fuzzy gray beard and said "just some sandpaper."

He continued, "what are you working on?"
"Just a piece of furniture." Leave me alone.
"Oh, well I refinish furniture too, maybe I can help."


Sigh.


He then proceeded to explain to me everything and anything I could know about sanding manually. I casually said I was using a bit of wood filler to fix some problem areas. He asked what problems. I hesitated. He was a wood purist and I knew what his reaction would be if he found out I defaced a perfectly nice veneered buffet from the 1930's. I told him that the top veneer had been partially removed. The curious old man pressed further, "how did that happen?" I'm a pitiful liar.

"I did it." I frowned shamefully.

"Oh, I see" he kindly stated, "well I won't chastise you for that, but you probably should have left it alone".

I knew very well he was right and that's why I was standing in the sandpaper aisle, trying to find a remedy for my mistake. He gave me very useful information on how I should approach my boo-boo and then wished me the best of luck. I saw the doubt in his eyes. I thanked him and grabbed my supplies and headed home.

My first step was filling in the spots I took off the veneer then sanding it as smooth as possible. It wasn't easy. I did my best. You can judge me if you must.


After I sanded it down really good I vacuumed and cleaned the piece really well. I wanted to keep some wood detailing because I love when pieces have some of their original character mixed with paint. I cleaned up the hardware, which was REALLY nasty before scrubbing it with silver cleaner and lemon juice.


I wanted to use Annie Sloan Chalk Paint in Florence but it wasn't at my local shop when I painted this piece. Because I have such great luck it was made available a week after I completed this buffet. Oh well. I made do with Benjamin Moore Paint & Primer in 1 in Juniper. What a color!!!! I used 2 coats on the body and 3 coats on the top surface. I love it. It adds so much character to the dining room!


Thursday, April 19

Paint...on a budget

I have wanted to paint our piano room since we moved in. I spend many hours a day there, I teach there, and I need it painted. Like now. But I couldn't decide on a color. It needs to exude relaxation and peace, at the same time be welcoming and inviting. Enter Restoration Hardware paint in Silver Sage, like this room below:


It's blue, it's green, it's gray...and it can hold it's own as a neutral. I love it. Our beautiful dark mahogany baby grand will look stunning next to this color. Normally it's $39 a gallon...yowza. I will need 2 gallons for the room, so I told myself to research some more. I called RH and it's on sale right now for $33, that's pretty good. Still not good enough.

Benjamin Moore makes a color that's a 95% match called Grey Wisp, according to a great website Color Charts that let's you search any color and find matches in other brands.

Shermin Williams makes a color very close called Comfort Gray. If you read this great great thread here you will see that a couple people actually have RH Silver Sage on their walls used SW Comfort Gray and despite the color charts looking different, it's an EXACT match. I believe that.

Quite honestly I don't trust the big boxes to get my color right. It's a delicate blend of blue, green and gray. Any more blue and I wouldn't like it, and more green and I would hate it. This color is really perfect for me.

Alright, now to price it out. BM and SW are still pricey (in my opinion). What I found out though, SW is starting a sale tomorrow 4/20/12 and paint is 40% off for 3 days. That's more my speed. High quality paint at very affordable prices. I'm heading over tomorrow morning to grab a couple gallons of their high end paint and get to the piano room painted!

 I'm so excited.

Tuesday, April 3

Goodwill Online Auction

There is something I have to tell you. It may not be a secret, but did you know Goodwill has an online auction? Yes, it's true. But here's the best part...you can find almost ANYTHING. It's like having access to the best goodwill stores online. No, you can't get furniture unless a local goodwill is auctioning it off since those are pick up only. What you can get are the wonderful treasures we hope to find at our local goodwill but don't. I almost wish I hadn't discovered it, and I'm pretty sure my best friend is going to put the kibosh on my bidding wars, but for now I'm having fun getting treasures at a great price. Here are some examples!

This sweet nutcracker stands 10" tall and is made by the Erzgebirge company in Germany. I can not find this particular one listed on their website, but I scored this little guy for a great price that was miles away from the $75 it would be from the Erzgebirge company. I don't collect nutcrackers, but he's such a cheerful addition with his lovely yellow coloring. I think I'll leave him by the entry so he can keep an eye on things.


I love this balance scale. It's industrial but not too big that it overwhelms the space. It's made by the Welch company. Looks so much like this one from the 1920's...I just love it!early 1920's enameled black cast iron double pan balance scale


I found these music books, dated 1925, which
arrived via UPS yesterday. It's a collection called the International Library of Music for Home and Studio, Study Music in Four Books for pianoforte. Charles Dennee created this teaching series for students to progress through these books and learn technique and style. Dennee was a teacher in Boston and had been a member of the New England conservatory since 1883. These books are historical, useful, and I am excited to learn from a great teacher! He even signed his picture in the first book!


I've been looking for a globe, I think they are great decorative pieces but they also serve a purpose. I snagged this one happily for $8! It's made by the Replogle World Classic Series. The globe is textured so you can feel the mountain ranges. It also has all the explorers and their pictures. So fun!


The Goodwill Stores are actually very good at listing the details about the items. Most haven't been tested, but some have and they will list the specifics on whether it still works or not. They list any damage to the items so you know ahead of time what you're getting.

Here are my suggestions when looking at Goodwill Auction:

1. To look for something specific, use the Search option, it will save time.

2. Read EVERYTHING about the item. Once you click on a picture, scroll down to see more pictures and any details about the condition and measurements.


extra pictures so you can see all the details


You can see the details and measurements and any testing or condition issues.

3. Bid the most you're willing to pay for the item the first time. It's based on proxy bidding. If you are unfamiliar with this type of bidding, read about it here.

4. Use the personal shopper if you are waiting for something particular to show up at auction.

5. Make sure you get the estimated shipping and handling before bidding and add that on to your final cost. Everything I have received has been wrapped very carefully, so it makes sense for them to charge between $1-3 for each item purchased.

The website is http://www.shopgoodwill.com/

Happy bidding!! 

Wednesday, March 28

Chalkboard Painted Mirror


I never liked the way chalk felt. It makes me cringe to hear someone write on a chalkboard. I shudder to think about fingernails. I still went out and bought a can of chalkboard spray paint. That was about 5 months ago. It sat with my other spray paint colors, watched as they were chosen for projects, wishing it were next. I just didn't know what to do with it. Then I remembered the mirror that was given to me. It was an "I don't want this anymore, Sarah do you want it?" kind of deal. Usually when family members are about to give something away they ask me first. I'm not a hoarder, I just like free stuff.
I had already started painting when I realized I should take a picture.

It was a small, nicely shaped mirror painted a shade of green that made me want to cry (see above). I knew I'd paint it but had no clue where to put it. So I started painting it with ASCP in Old White hoping I'd figure out what to do with it. I love that color. That's when it hit me! CHALKBOARD PAINT! The mirror was begging for it. I gave the mirror 2 coats, let it dry and prepped it for use today! It is now our little welcome sign as you come in through the garage..


Friday, March 23

Framed Butterfly Print

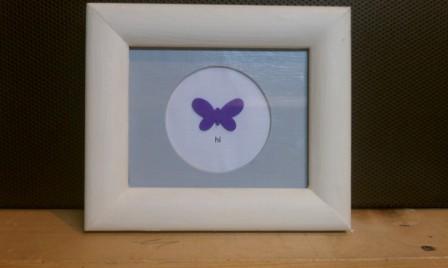
I made this  for a friend's baby shower as part of her gift. She is having a girl, so butterflies and pinkish hues work well for this project. If it were a boy I may have to think twice. 

Anyways...I needed a small cute frame to paint but I also needed a frame that had a matte. Don't let the picture deceive you, it's about 5 inches tall. I just thought you would like to see the lovely friends forever ducklings. So...cute. Ducks are what come to mind when I think my best friend. But they had to go for this baby shower gift.

To beautify this frame and matte I used 2 colors, ASCP in Old White for the frame and an oops paint that is a very pretty grey/blue color for the matte. Both received 2 coats of paint.


I always have a hard time letting things dry. While I waited I went to my computer, printed out the word "hi" in Maiandra GD font.  I placed a purple butterfly sticker (Target dollar bin!) above the word and cut it out to fit my matte. I would have chosen a pink butterfly because it looks better against the gray paint, but my friend doesn't like pink, so there you go. I still might change it. I couldn't wait to put it together!

up close